You probably think that opening an incognito window keeps your browsing private. No history, no cookies, no traces — right? Unfortunately, that assumption is dangerously wrong. Even when you use incognito mode, and even if you have a VPN running, your DNS queries may still be silently exposing every single website you visit. This vulnerability is known as a DNS leak, and it is far more common — and far more dangerous — than most people realize. In this article, we will take a deep dive into how DNS leaks work, why incognito mode cannot protect you, and what steps you can take to truly safeguard your online privacy.
What is DNS?
DNS stands for Domain Name System, and it is often described as the "phonebook of the internet." When you type a website address like www.google.com into your browser, your computer does not inherently know where that website lives. Computers communicate using numerical IP addresses (such as 142.250.80.46), not human-friendly domain names. The DNS is the system that translates the domain names we use into the IP addresses that machines understand.
When you enter a URL and press Enter, a sophisticated chain of DNS resolution steps takes place behind the scenes:
- Browser cache check: Your browser first looks in its own local cache to see if it already has the IP address for this domain. If it does, the cached result is used immediately without any further queries.
- Operating system cache check: If the browser cache has no record, the request is passed to your operating system. The OS checks its own DNS cache as well as the local
hostsfile for any matching entries. - Recursive resolver query: If no local records exist, the request is sent to a DNS recursive resolver — typically a DNS server provided by your ISP, or a public DNS service like
8.8.8.8that you have manually configured. - Root name servers: If the recursive resolver does not have the answer cached, it queries one of the 13 sets of root name servers distributed globally. The root server does not provide the final IP address directly; instead, it directs the resolver to the appropriate Top-Level Domain (TLD) server.
- TLD name servers: The resolver then queries the relevant TLD server (for example, the
.com,.org, or.cnserver), which responds with the address of the authoritative DNS server for that specific domain. - Authoritative DNS server: Finally, the resolver queries the authoritative DNS server, obtains the definitive IP address, and returns the result to your browser so it can connect to the website.
This entire process typically completes in mere milliseconds, and users rarely notice it happening. But here lies a critical privacy concern: traditional DNS queries are completely unencrypted. This means your ISP, network administrators, and even attackers on the same network can see exactly which domain names you are querying — effectively, which websites you are visiting. Even if the website itself uses HTTPS to encrypt the page content, the DNS query remains in plaintext. Think of it like sending a letter in a sealed, encrypted envelope, but writing the recipient's address on the outside for everyone to see.
What is a DNS Leak?
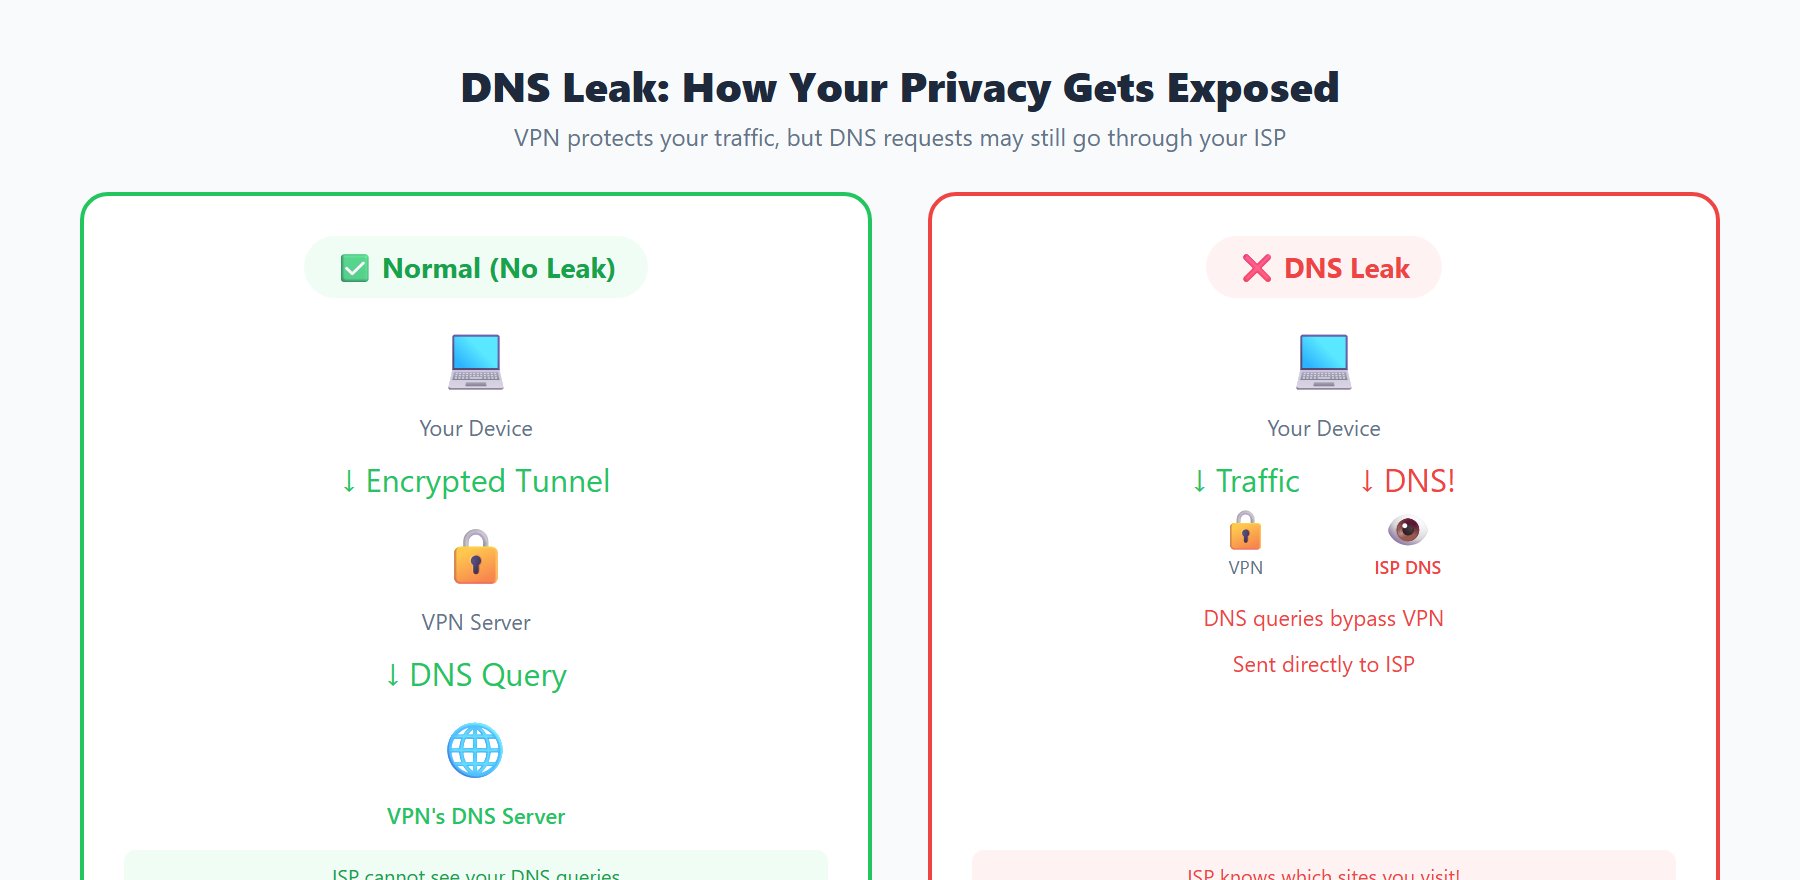
A DNS leak occurs when your DNS query requests bypass the secure channel you intended to use — such as a VPN tunnel or encrypted proxy — and are instead sent directly to your ISP's default DNS server or another unprotected DNS resolver. In other words, even though you believe you are browsing securely through a VPN, your DNS requests may still be "leaking" out to your ISP.
When a DNS leak occurs, your internet service provider can observe:
- The domain name of every website you visit, including those you intended to keep private
- Timestamps of your queries, revealing exactly when you accessed each website
- Query frequency patterns, showing how often you visit certain specific sites
- Your browsing profile, which can be constructed by analyzing your DNS query history to map your interests, habits, and behavioral patterns
This represents a serious privacy vulnerability because many VPN users specifically chose a VPN to avoid precisely this kind of surveillance. If a DNS leak exists, the privacy protection that the VPN is supposed to provide becomes effectively useless.
Common Causes of DNS Leaks
Misconfigured VPN
This is one of the most frequent causes of DNS leaks. Many VPN clients do not force all DNS queries through the VPN tunnel by default. This is especially problematic when split tunneling is enabled, as some traffic — including DNS queries — is routed directly through your local network instead of the VPN. Some inexpensive or poorly configured VPN services do not even offer DNS leak protection as a feature. Additionally, when a VPN connection briefly drops and reconnects, DNS queries may escape through the default channel during that brief gap.
IPv6 DNS Requests
Many VPN services only tunnel IPv4 traffic while completely ignoring IPv6. If your network supports IPv6 — and increasingly, networks do — your device may send DNS queries over IPv6, completely bypassing the VPN tunnel. This type of IPv6 DNS leak is particularly insidious because users typically have no idea their device is performing DNS resolution over IPv6. Many users do not even know their network supports IPv6, making this leak especially difficult to detect.
Operating System Smart Multi-Homed Name Resolution
The Windows operating system includes a feature called Smart Multi-Homed Name Resolution. This feature is designed to speed up DNS resolution by simultaneously sending DNS queries to all available network interfaces. This means that even when you are connected to a VPN, Windows may send DNS queries through both the VPN interface and your local network interface at the same time. Whichever response arrives first is the one that gets used. This "optimization" feature is catastrophic for privacy because it virtually guarantees that your DNS queries will leak outside the VPN tunnel. In Windows 10 and Windows 11, this feature is enabled by default.
Transparent DNS Proxies
Some internet service providers employ transparent DNS proxy technology. Even if you manually configure your DNS server to use a third-party service like Google's 8.8.8.8 or Cloudflare's 1.1.1.1, the ISP can intercept all traffic destined for port 53 (the standard DNS port) at the network level and redirect it to their own DNS servers. This means that while you think you are using a secure third-party DNS, your queries are actually still being processed and logged by your ISP. This technique is completely transparent to users and is extremely difficult to detect unless you specifically test for it.
Why Incognito Mode Cannot Prevent DNS Leaks
Many users hold a common misconception that their browser's incognito mode (also called private browsing mode) protects their online privacy. The reality is that incognito mode's protection is extremely limited in scope, and it is completely incapable of preventing DNS leaks.
Here is what incognito mode actually does:
- Does not save your browsing history locally
- Automatically deletes cookies and session data when you close the window
- Does not save form autofill data
- In some browsers, blocks third-party cookies by default
But what incognito mode does not do is what really matters:
- Does not encrypt your network traffic: All data still travels through the network in the normal way
- Does not change your DNS resolution method: DNS queries still go through your operating system's normal network stack, sent to your configured or default DNS server
- Does not hide your IP address: Websites you visit can still see your real IP address
- Does not prevent ISP monitoring: Your ISP can still see all your DNS queries and network traffic metadata
- Does not block network-level surveillance: Network administrators and man-in-the-middle attackers can still observe your network activity
In simple terms, incognito mode only makes you "invisible to your own computer" — it prevents other people who share the same device from seeing your browsing history. But when it comes to network-level privacy, it does virtually nothing. Your DNS queries are still sent in plaintext, and your ISP can still maintain a complete record of every website you have visited.
How to Detect DNS Leaks
Detecting DNS leaks is relatively straightforward, yet many users have never thought to perform this kind of test. Here are several effective detection methods:
- Use online DNS leak test tools: Visit dedicated DNS leak testing websites. These tools send multiple specially crafted DNS queries through your browser, then check which DNS server resolved those queries. If the DNS server shown belongs to your ISP rather than your VPN provider, you have a DNS leak.
- Check your DNS resolver: Use command-line tools like
nslookupordigto see your current DNS resolver. On Windows, you can usenslookup; on Linux and macOS, thedigcommand is available. Compare the actual DNS server being used against what you expect it to be. - Compare VPN DNS versus actual DNS: After connecting to your VPN, verify whether your DNS server has actually switched to the one provided by the VPN. Many VPN providers operate their own DNS servers — if your DNS still points to your ISP after connecting, a leak exists.
- Use Wireshark for packet analysis: For technical users, packet capture tools like Wireshark allow you to directly observe traffic on port 53 (DNS). This is the most precise detection method and lets you see exactly where your DNS queries are being sent.
We recommend testing both before and after connecting your VPN, then comparing the results. If you can still see your ISP's DNS server after the VPN is connected, you have a DNS leak problem that needs to be addressed.
How to Prevent DNS Leaks
Use DNS-over-HTTPS (DoH) or DNS-over-TLS (DoT)
DNS-over-HTTPS (DoH) and DNS-over-TLS (DoT) are two protocols designed to encrypt DNS queries. DoH encapsulates DNS queries within HTTPS traffic on port 443, making them indistinguishable from regular HTTPS web traffic — your ISP cannot identify or intercept them. DoT uses a dedicated port 853 for encrypted DNS communication. All major browsers (Chrome, Firefox, Edge) and operating systems (Windows 11, macOS, iOS, Android) now support DoH. Once enabled, your DNS queries are encrypted, and your ISP can no longer see which domain names you are querying.
Manually Set Trusted DNS Servers
Configure your device to use well-known, privacy-focused public DNS services:
- Cloudflare DNS:
1.1.1.1and1.0.0.1(committed to not logging queries, extremely fast) - Google Public DNS:
8.8.8.8and8.8.4.4(extensive global coverage, highly reliable) - Quad9 DNS:
9.9.9.9and149.112.112.112(automatically blocks malicious domains, security-focused) - AdGuard DNS:
94.140.14.14and94.140.15.15(includes built-in ad filtering)
While manually setting DNS servers alone cannot fully prevent transparent proxy interception, combining this with DoH or DoT provides robust protection.
Ensure Your VPN Forces DNS Through the Tunnel
When choosing a VPN service, make sure it offers the following features:
- DNS leak protection: Forces all DNS queries through the VPN tunnel
- Kill switch: Automatically disconnects your internet when the VPN connection drops, preventing leaks during reconnection
- Proprietary DNS servers: Uses DNS servers operated by the VPN provider itself, rather than relying on third parties
- Full IPv4 and IPv6 support: Ensures all protocol traffic is routed through the tunnel
In your VPN client settings, disable split tunneling (unless you fully understand the implications) and enable all available leak protection options.
Disable IPv6 If Your VPN Does Not Support It
If your VPN does not support IPv6 tunneling, the safest approach is to disable IPv6 at the operating system level. On Windows, you can uncheck "Internet Protocol Version 6 (TCP/IPv6)" in the network adapter properties. On Linux, you can disable IPv6 through sysctl commands or network configuration files. While this is not an ideal long-term solution — IPv6 is the future of the internet — during the transition period where VPNs do not fully support IPv6, it is an effective way to prevent IPv6 DNS leaks.
Use Tools Like dnscrypt-proxy
dnscrypt-proxy is an open-source DNS proxy tool that supports multiple encryption protocols including DNSCrypt, DoH, and ODoH (Oblivious DNS-over-HTTPS). It runs a local DNS proxy server that encrypts all DNS queries before forwarding them to upstream DNS servers that support encryption. Additionally, it provides advanced features such as DNS query logging, blocklist filtering, and load balancing. For technical users, this is an extremely powerful and flexible DNS privacy protection tool. Installation and configuration are relatively straightforward, with support for Windows, macOS, Linux, and other major operating systems.
Use ipinfo.im to Check Your DNS Security Status
Want to quickly assess your current network privacy status? ipinfo.im provides convenient IP address lookup and network security detection tools. By visiting ipinfo.im, you can instantly see your public IP address, geographic location information, ISP details, and whether you are currently using a VPN or proxy. This information helps you quickly determine whether your VPN is functioning correctly and whether your real network identity is being exposed.
Regularly checking your IP and DNS status is a good habit for maintaining network privacy. Remember, true online privacy requires multiple layers of protection — relying solely on incognito mode or a single VPN is far from sufficient. By combining encrypted DNS, a reliable VPN service, and regular security checks, you can maximize the protection of your online privacy.